
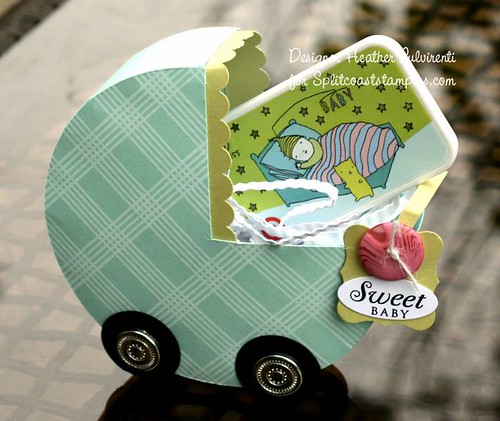
Hey guys! Long time no post... LOL, okay, so it's only been a few days, but it feels like FOREVER. I've been really busy trying to get some things ready for a craft fair that I'm participating in on Saturday, so I haven't had time to make any new cards... Back into the gallery archives we go! :) This little 3D baby carriage was one of the items I made for the June Dirty Dozen Gallery.
Here's how it came together... I cut out two 4 1/2" circles using the George & Basics Shapes Cricut cartridge, then stamped the plaid pattern in Fresh Snow ink. Once the circles were dry, I cut off 1/4 from each circle (the 12 o'clock to 3 o'clock position). Next, I punched out four Basic Black circles, and lined them up on the circles and punched the holes for the brads. I attached them to each side of the carriage, and then put Tacky Strip along the outer edge of the inside of the carriage. I then attached the two sides together with a 2 1/2 x 11" piece of matching CS (giving a 1/4" scored edge along the length of the piece on each side). I found it was easier to create the curves by cutting slits into the scored pieces at every 1/2" or so. LOL, clear as mud? :) To finish up, I added a scalloped edge for the carriage top, a handle, and a little tag.
Well, back to the grind for me... Have a great day!! :)
Supplies:
Stamps - Background Basics: Retro, Mega Mixed Messages
Ink - Fresh Snow, Stazon Black
Paper - Aqua Mist, Spring Moss, Stamper's Select White, Basic Black
Miscellaneous - Silver Brads, Small Oval Punch, Curvy Label Punch, Hibiscus Burst Button, Twin, Scallop Border Punch
You got real dirty with this one! I LOVE IT!
ReplyDeleteThis is so cute, Heather! I loved it then and I still love it! Such a cute design!
ReplyDeleteOh I remember this and it is STILL just as gorgeous!!!
ReplyDeletethis is so cute!!! what a great little project.
ReplyDeleteSuper cute!! Good luck with the craft fair!
ReplyDeleteYowzers! I'm doing this! Can you supervize? LOL! FABNESS top to bottom!
ReplyDeleteHow sweet! Totally love this!
ReplyDeleteI know the feeling of working like a mad woman creating for a craft fair. Mine first one is in a couple weeks! Yikes! You'll have to let me know how yours goes- are you going to post pictures? I hope so! I'm sure you're gonna do fabulous...your items are so gorgeous!
ReplyDeleteHow adorable, this is just precious.
ReplyDeleteTHAT. IS. INSANELY. CUTE. I looooove seeing things like this - - it's soooo inspiring (and that's not a cliche'). To see people create bigger and better things than "just a card" from our little papercrafting hobby makes me sooooo warm inside. This is really really well done; love it!
ReplyDeleteThis is so adorable!!
ReplyDeleteOMgosh...this is fantastic, Heather!!
ReplyDeleteThis is so mega cute! WOW!! Absolutely adorable!
ReplyDelete