Showing posts with label Halloween. Show all posts

9.05.2017

RC Sneak Peek Day 1 - Sending Monster Hugs


Hello! It's the first day of Reverse Confetti September sneak peeks, and today I'm sharing a card created using the new Monsterous stamp set, the Boo to You Circle Confetti Cuts and Wonky Stripe Panel Confetti Cuts dies, and my newest 6x6 patterned paper pad, Every Little Bit. :)

To create my card, I started by first creating a Stone card base and adhering a small strip of striped patterned paper from the Warm Hearts paper pad.  I then die cut a piece of Cloud White cardstock using the Wonky Stripe Panel Confetti Cuts and backed it with one of the patterns from the Every Little Bit paper pad.  Next, I stamped one of the monsters from Monsterous in Versafine black ink onto watercolor paper, and heat set it with clear embossing powder before coloring it with Zig Clean Color markers.  


While the image was drying, I then die cut the large scalloped circle using Lime Green cardstock, the white circle using Cloud White cardstock, and the Boo to You Confetti Cuts.  The two die cuts were adhered together, and then the sentiment from Monsterous was stamped in black ink.  Once the monster image was dry, it was die cut using the Monsterous Confetti Cuts dies.  To finish up, the polka dot panel was adhered to the card base, the scalloped circle was adhered with foam tape & I embellished with purple enamel dots.


Would you like to be entered for your chance to win one of two gift certificates to RC (one for blog commenters, and one for Facebook commenters)? To enter, simply leave comments on the RC DT blogs, then hop on over to the Reverse Confetti Facebook page. (Full details can be found over on the RC Blog.)

Have a great one!

10.18.2016

Happy Fall-idays with Reverse Confetti


Hello! Over the next few days, the Confetti Crew will be sharing some fabulous holiday projects, and first up is Halloween! :)

For my project today, I decided to create a little trio of tags to dress up some cute purple sprinkle donuts. :) To create my tags, I started by first die cutting tag bases from RC Aqua cardstock using the Topped Off Tag Confetti Cuts.  I then used the Big Stripes Layer Confetti Cuts on Lime Green, Iced Aqua and Grape Soda cardstocks, then adhered them to the tag bases.  Next, I used the Hang Ups, Too Confetti Cuts on cardstock, then adhered them to the tags.  Next, I die cut the ghosts from Cloud White cardstock using the Halloween Bits Confetti Cuts.


I then die cut three Stone cardstock circles using the Circles 'n Scallops Confetti Cuts, and stamped them with two of the sentiments from Donut You Know in black ink.  One of the sentiments from Treat Yo' Self was stamped in black ink onto cardstock strips, then trimmed with banner ends.  The ghosts were adhered to the back of the cardstock circles, then the boos were attached with foam tape.  To finish up, I attached the tag pieces together, then secured them to the donut bags with metallic twine.


Here's the full list of today's hop participants:


Have a great one!

9.22.2016

You're So Fab{BOO}lous


Hello! Hope your week has been going well! :) I'm popping in to share one of the cards from the last Reverse Confetti release that I hadn't had a chance to share yet here on my blog.  

To create my card, I started by first creating a card base using Cloud White CS.  I then mixed together some embossing paste with Lime Green ink and used the Lotsa Dots Stencil to add some texture to the card base.  Next, I die cut a ghost shape using the Halloween Bits Confetti Cuts on Iced Aqua CS, then covered it with stickles.  While the die cut was drying, I then used the Woodgrain Confetti Cuts on a piece of light gray CS.


I then stamped one of the sentiments from Treat Yo' Self in black ink, and added a strip of Fright Night patterned paper to the bottom of the card before wrapping it with Charcoal Striped Twine.  I then adhered the sentiment panel to the card front using foam tape before securing the ghost to the card front with pop dots.  To finish up, I embellished with purple enamel dots.


Have a great one!

9.05.2016

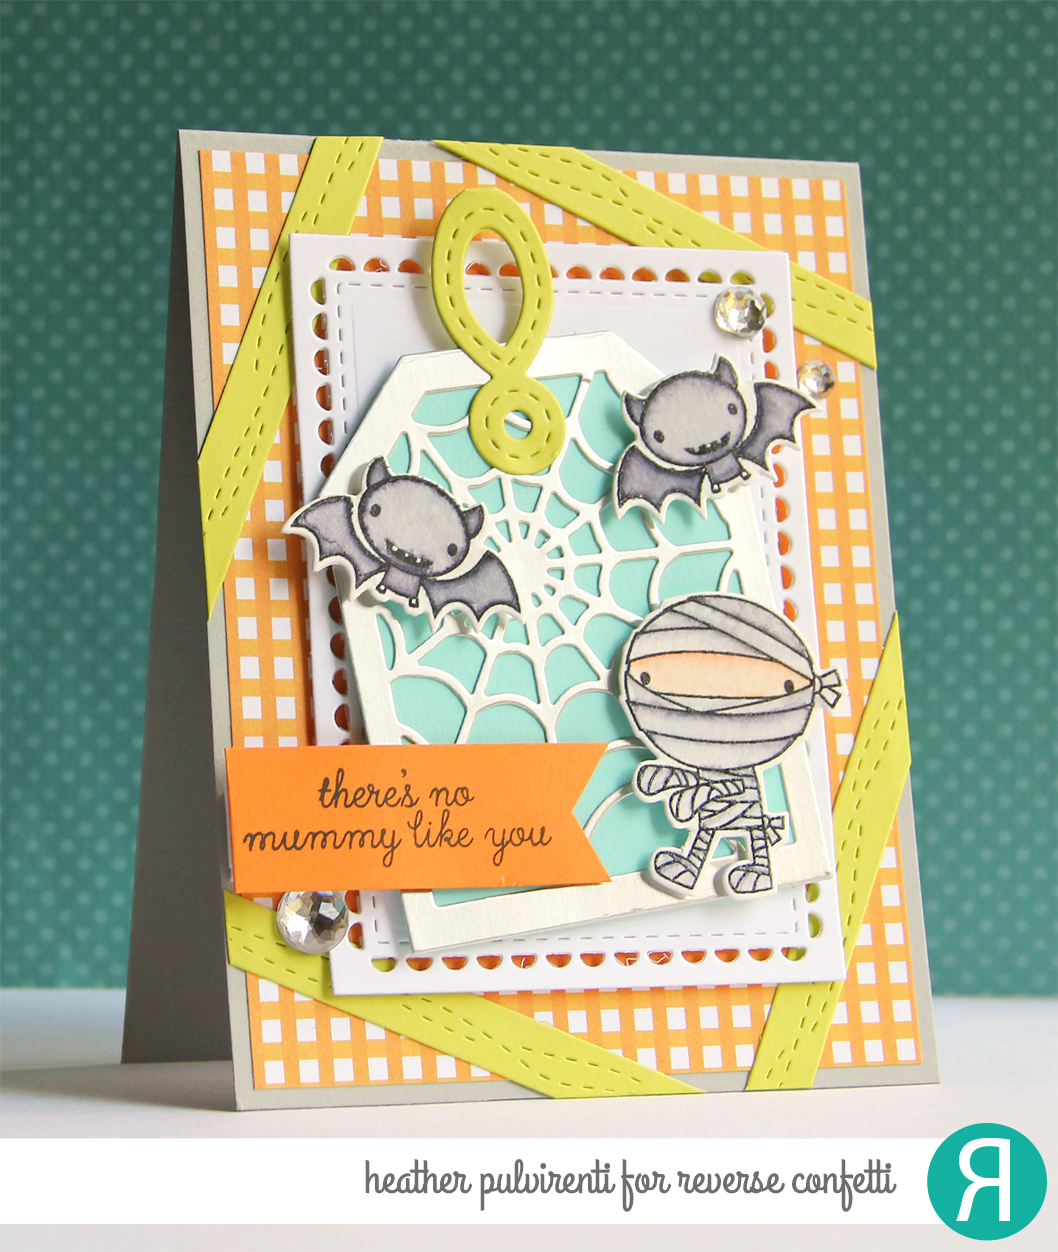
RC Sneak Peek Day 1 - There's No Mummy Like You


Hello! It's the first day of sneak peeks for the Reverse Confetti September Release, and if you've been following along with RC on Instagram and Facebook, then you know there are a bunch of AMAZING new products being released this month! In addition to the fabulous stamps and dies you've come to expect every month from RC, ink, cardstock, stencils and paper pads are now being added to the line up. :) 

To create my card, I started by first cutting a piece of orange and white patterned paper from the Fright Night paper pad and adhering it to a medium gray card base.  I then stamped several of the images from Best Witches in Versafine black ink onto watercolor paper, then heat setting them with clear embossing powder.  The images were then colored with Zig Clean Color markers and die cut with the Best Witches Confetti Cuts once they were dry.  Next, I die cut a tag base using the Topped Off Tag Confetti Cuts on Iced Aqua CS and topped it with a spider web tag created from die cutting silver foil CS with the Web Tag Layer Confetti Cuts.  I then used the Hang Ups, Too Confetti Cuts on lime CS and adhered it to the tag.  


The Lacy Scallop Frames Confetti Cuts were used on Cloud White CS, and the webbed tag was adhered to the top of the frame before both pieces were attached to the card front with foam tape.  I then used the All Frame Up Confetti Cuts on lime CS and adhered it to the card base on an angle trimming off the excess.  The sentiment was stamped on a small strip of Tangerine CS, then adhered to the card front.  To finish up, I adhered the watercolored images, then embellished with clear gems.


Would you like to be entered for your chance to win one of two gift certificates to RC (one for blog commenters, and one for Facebook commenters)? To enter, simply leave comments on the RC DT blogs, then hop on over to the Reverse Confetti Facebook page. (Full details can be found over on the RC Blog.)

Have a great one!

10.13.2015

Happy Fall-idays with Reverse Confetti


Hello! Over the next few days, the Confetti Crew will be sharing some fabulous holiday projects, and first up is Halloween! :)

For my project today, I decided to create a Project Life layout documenting some of my daughter's Halloween costumes from years past.  You might say she's a big Disney princess fan. *wink* I went a little nuts with my Fuse tool, but I love how this page turned out!

Here are some detail shots of my page:


Orange CS: I heat embossed the strip of outline stars from Oh My Stars with white embossing powder.  

Green CS: I stamped the spider web image from Too Cute to Spook in versamark ink.


Batty For You Card: Stamped the bat images with versafine ink before heat embossing with clear powder and coloring with watercolors.  Added an aqua watercolor wash background once bats were dry. Used the Circles 'n Scallops Confetti Cuts on green CS, then stamped it with part of the sentiment from Spooky Sentiments.  The remainder of the sentiment was stamped on an orange CS strip.

Cat Card: Several of the images from Too Cute to Spook were stamped with versafine ink before heat embossing with clear powder and coloring with watercolors.  Once dry, images were cut out with their coordinating confetti cuts.  A green watercolor wash was added to the background, then the broom was stamped and colored.  Once dry, all die cut pieces were adhered.

Aqua CS:  It's hard to see in the pic, but many of the sentiments from Spooky Sentiments and Too Cute to Spook were stamped in versamark ink to create a background.  The pumpkin and ghost images were added to fill in open spots.


Sparkle Card: Orange watercolor wash added to the background, then aqua/teal paint splatters were added.  Once dry, sentiment from Shine From Within was stamped in versamark ink and heat set with silver powder.  A banner was cut using the Star Garland Confetti Cuts, then adhered to the card front.

Spider Card: Orange, turquoise and green distress inks were blended onto watercolor paper, then drops of water were added to the front.  Once they had a chance to sit for a moment or two, they were then dabbed with a paper towel.  The Geometric Confetti Cut was then used on a piece of silver foil, then adhered to the card front.  The spider from Too Cute to Spook was stamped in versafine, heat set with clear powder, then colored.  Once dry, the image was cut out and adhered to the card.


Orange CS: I heat embossed the strip of outline stars from Oh My Stars with white embossing powder.  

Green CS: I stamped the spider web image from Too Cute to Spook in versamark ink.


Stamp Sets:
Spooky Cuties
Spooky Sentiments
Too Cute to Spook
Shine From Within
Oh My Stars

Confetti Cuts:
Circles 'n Scallops
Too Cute to Spook
Double Edge Wonky Scallop Border
Star Garland
Geometric

Here's the full list of Halloween Fall-idays participants!

Amy Kolling

Have a great one!

10.02.2015

Happy Halloween


Hello! I'm posting over on the Winnie & Walter blog today, but wanted to share my card here as well... I finally broke down and bought a Minc about a month ago, and it's so fun! If only I could figure out how to take photos that could capture just how pretty that shiny image really is! Lol :)

To create my card, I started with a piece of white paper and stamped the spiderweb image from Moonlight in Versafine Ink to create the background.  I then photocopied the design onto a piece of white CS, then ran it through my Minc machine with silver foil.  Next, I die cut three scallops using one of the border dies from the Goldie Trim Cutaways on black CS, then adhered them to the foiled CS layer.


I adhered the foiled layer to a piece of coral CS, then attached it to a light orange card base.  I stamped one of the sentiments from Moonlight onto coral CS in black ink, trimmed one end into a banner shape then adhered it to the card front with pop dots.  To finish up, I used the Big, Bold and Happy Cutaways on a piece of silver foil CS and adhered it to the card front before embellishing with light orange enamel dots.

Have a great one! :)
9.05.2015

Happy Boo Day!


Hello! It's the 5th of the month, and that means it's time for another round of Reverse Confetti sneak peeks! For my card today, I'm featuring the new Too Cute to Spook set, coordinating Confetti Cuts, Double Scallop Garland, and Fall Fun Quick Card Panels. ♥

To create my card, I started by stamping a bunch of the images from the Too Cute to Spook set in versafine ink, then colored them in with watercolor pencils.  While the images were drying, I die cut a green CS border using the Wonky Double Scallop Border Confetti Cuts, then adhered it to the back of one of the Fall Fun QCPs.  I then adhered the layer to a light blue card base.


Once the images were dry, I die cut them all using the Too Cute to Spook Confetti Cuts.  Next, I used the Double Scallop Garland Confetti Cuts on green and orange CS, then adhered them to the card front.  I then assembled the pieces of the witchy kitty, securing them to the card front with pop dots.  The skeleton garland and spider were then adhered to the top left corner of the card base.  To finish up, I added winks of stella glitter to several accents, then embellished with light blue enamel dots.


Would you like to be entered for your chance to win one of two gift certificates to RC (one for blog commenters, and one for Facebook commenters)? To enter, simply leave comments on the RC DT blogs, then hop on over to the Reverse Confetti Facebook page. (Full details can be found over on the RC Blog.)

Have a great one!