

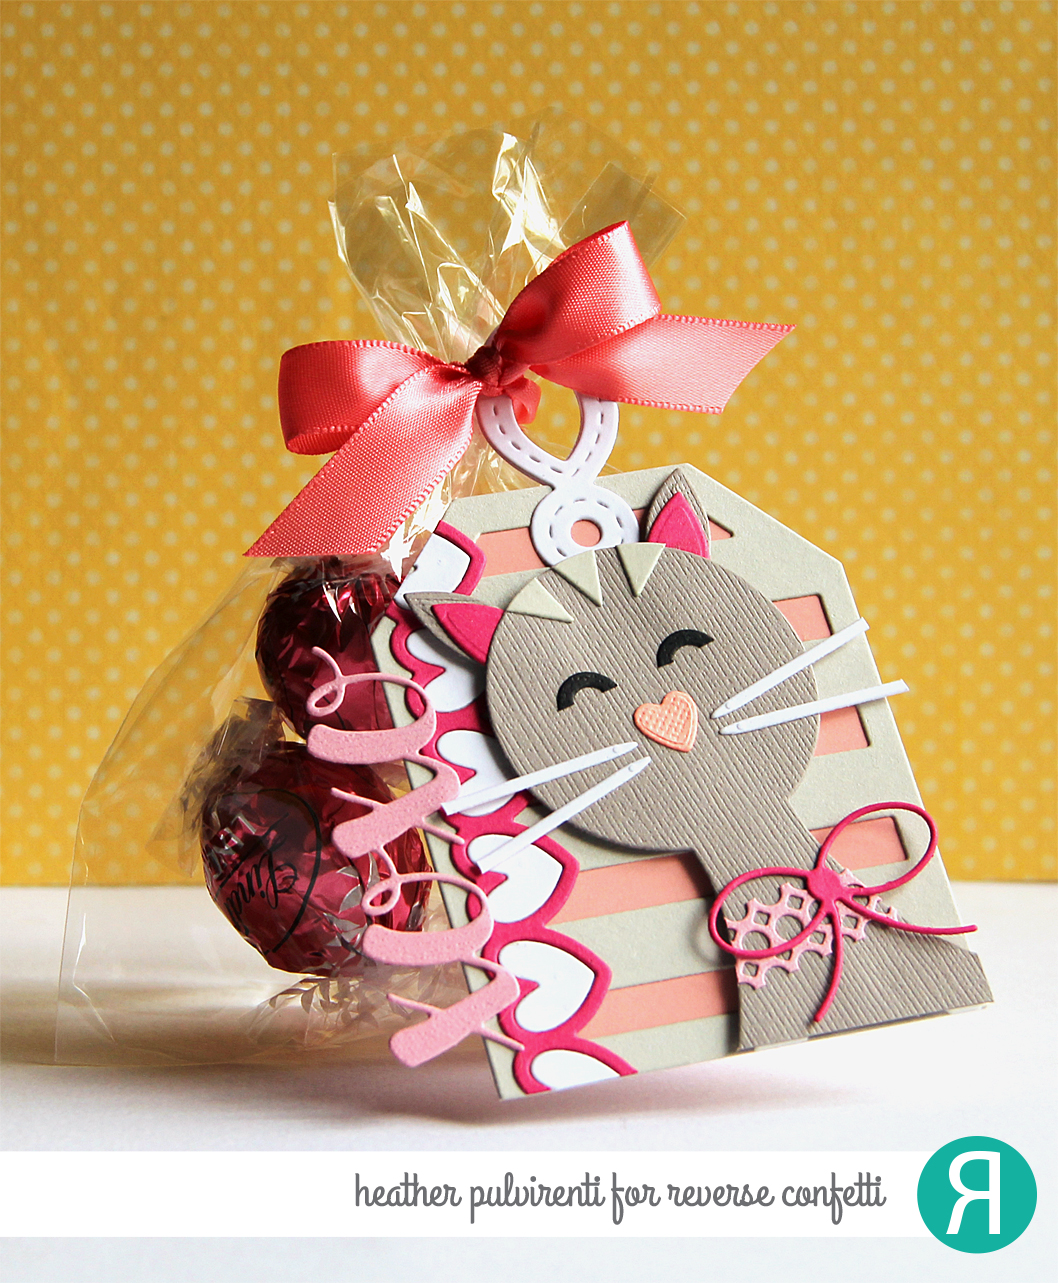
Hello! It's the 8th of the month, which means it's Reverse Confetti blog hop time! :) Since Valentine's Day is just around the corner, I thought it'd be fun to create a little treat and tag combo. My daughter is obsessed with cats, so I used just about every Confetti Cut known to man to create this little critter! :) Haha... Okay, so I didn't really use *that* many, but I did end up using about 8 different dies to create the kitty for my tag. :)
To create my tag, I first started by die cutting my tag base using the Topped Off Tag Confetti Cuts on coral CS, then topping it with a piece of gray CS die cut with the Big Stripes Tag Layer Confetti Cuts. I then used the Hang Ups Too Confetti Cuts on a piece of white CS and adhered the die cut to the tag base. Next, I used the XOXO Hearts Confetti Cuts on white, pink and fuchsia CS to create the heart strip and XOXO sentiment. The heart strip was attached to the tag front leaving a little room on the left edge to adhere the sentiment. Once both pieces were attached to the tag, I then went back and glued in all the little white hearts.

Whew! A lot of little steps to create that kitty, but it's so worth it because I just *know* my kiddo is going to love it. :)
Thanks for stopping by today, here's the full list of today's hop participants if you'd like to check out their awesome projects:
Have a great one!
Such an adorable tag!!
ReplyDeleteSo Cute!!
ReplyDeleteMy reason for paper crafting...making little 'thank yous' for others. How cute is this?
ReplyDeleteSo incredibly CLEVER and CUTE.
ReplyDeleteWhat an adorable treat - the kitty turned out absolutely darling!
ReplyDeleteSo cute! Definitely a little gift to bring a big smile to anyone. Love this ♥
ReplyDeleteOMG so cute and clever Heather! How did you ever think of this?
ReplyDeleteThat is just so sweet. I like kitties too. Love it.
ReplyDeleteI lOVE this cat! So VERY creative!The whole tag is great!
ReplyDeleteHow cute is that? Absolutely adorable! I think you should give the super cute cat tag to your daughter and send me the chocolates - HA! Thanks for the inspiration!
ReplyDeleteCute tag.
ReplyDeleteThis tag is so cute! Very creative. Thanks for sharing.
ReplyDeleteAdorable with this cat!
ReplyDeleteHow clever! Such a cute tag!
ReplyDeleteSo cute and clever! Love the kitty!
ReplyDeleteMy oh my, this is so so cute!
ReplyDeleteWow! What an amazing idea you came up with! Adorable!
ReplyDeleteLove this adorably sweet kitty cat tag!!!
ReplyDeleteAdorable! I love all the layers and the cute kitty cat :)
ReplyDeleteWow what a fabulous job of making that kitty. This tag is great with all the different layers.
ReplyDeleteWhat a great use of the die and great tag idea! Love it!
ReplyDeleteSo cute and really creative using all those dies to make the kitty:). Thank you for sharing!
ReplyDeleteThis is so clever! Love it!
ReplyDeleteVery cute! I'm really loving the kitty!! MEOW!! ºÜº
ReplyDeleteThe kitty is so cute!!
ReplyDeleteWhat a clever idea Heather. My daughter is kitty obsessed too! Such a darling tag.
ReplyDeleteYour sweet kitty turned out soooooo cute! So creative and fun!!!!!
ReplyDeleteOMG! That kitty cat is so cute!
ReplyDeleteEEKKK!!! You tag is absolutely adorable and way too clever!!
ReplyDeleteOMG! It's a KITTY! LOVE this! Have to have it!
ReplyDeleteThat kitty is the cutest! Great project
ReplyDeleteOh wow, that kitty is so cute! I completely agree that the hard work was worth it - truly adorable.
ReplyDeleteVery sweet tag! I really like all the neat dies you incorporated.
ReplyDeleteHeather this is great!
ReplyDeleteI like the little extras like the bow on the cat's collar. It's a nice touch.
ReplyDeleteSuper cute. Love the new stamps and die cuts. Very creative.Wow!
ReplyDeletePraying for Jen hoping for a full recovery.
ReplyDeleteGreat blog hop love n adore this cat
Love RC's unique style! So fun
ReplyDeleteSuper fun. This would be something special for someone special.
ReplyDeleteThat kitty is precious!
ReplyDeleteThis comment has been removed by the author.
Deletekitty kitty kitty....."love" her
ReplyDeleteLove your cute kitty tag!
ReplyDeleteCute treat bag tag!
ReplyDeletethat kitty is darling.
ReplyDeleteLove to use my punches/die
to make another item
thanks for sharing.
awesome project! hope my blog is at least this cool
ReplyDeleteloveisintheair10.blogspot.com.br