Showing posts with label Etsy Inspired. Show all posts

1.30.2010

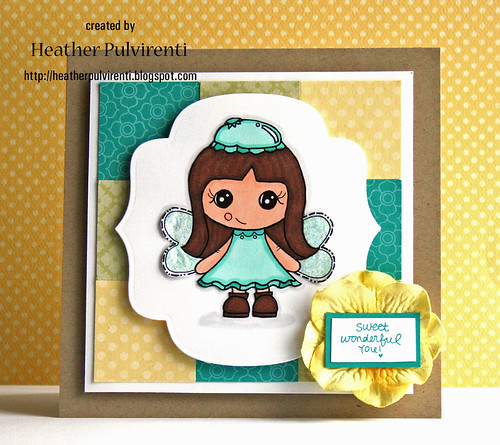
Etsy Inspired Challenge #73 - Sweet, Wonderful You!

Hi everyone, happy Saturday! :) I can't believe the month has flown by and this is my last post as a guest designer for the EtsyInspired Challenge.

Today's card was created for this week's EtsyInspired Challenge. The Etsy store we're using as today's inspiration is Elies Happy Hats. They offer all kinds of super adorable crocheted beanies for little ones, and the colors are fantastic! I used the beanie below as my inspiration (just look at that gorgeous little kiddo!), focusing on the colors and patchwork design:


To be entered for a chance to win this week's prize, all you have to do is create a card using one of the items from the Elies Happy Hats shop as inspiration, and link back to the EtsyInspired blog by Friday, February 5th. (Please click the EtsyInspired link for more info.)

Have a great day!

1.23.2010

Etsy Inspired Challenge #72 - You Make Me Smile


Hi everyone! Hope your Saturday is off to a fabulous start. :) Lots and lots of crafty folks are out enjoying themselves at CHA, and while I wish I was one of them, I'm still kickin' it in Maryland! LOL Oh well... maybe one day! :)

Today's card was created for this week's EtsyInspired Challenge. The Etsy store we're using as today's inspiration is Sweetie Pie Tutus. They have all kinds of adorable tutus, hair accessories, fairy wings for girls, and even some super sweet beanies... I picked the butterfly hair clippies below as my inspiration piece, and wanted to focus on the colors and butterfly shapes for my card.


To be entered for a chance to win this week's prize, all you have to do is create a card using one of the items from the Sweetie Pie Tutus shop as inspiration, and link back to the EtsyInspired blog by Friday, January 29th. (Please click the EtsyInspired link for more info.)
Instructions:

  • Create A2 card base using white CS.
  • Stamp sentiment in black ink, then emboss card base with dots using Cuttlebug.
  • Attach hot pink ribbon, then layer other pink ribbon on top and create bow.
  • Punch out three butterfly shapes using Sizzix Butterfly Die.
  • Stamp butterflies with background image in white ink, then embellish with black rhinestones.
  • Attach butterflies to card base with pop dots.


Supplies: Stamps - Signature Greetings, Background Basics: Petal Power Ink - True Black, Fresh Snow Paper - Stamper's Select White, New Leaf, Plum Pudding, Bermuda Bay Miscellaneous - Hot Pink Satin Ribbon, Hibiscus Burst Satin Ribbon, Black Rhinestones, Cuttlebug Swiss Dots Embossing Folder, Sizzix Butterfly Die

1.16.2010

Etsy Inspired Challenge #71 - Love You Forever


Good morning! I hope you're having a great Saturday! :) Today's card was created for this week's EtsyInspired Challenge.


The Etsy store we're using as inspiration this week is Amethyst Soap. The soaps offered in this store are *gorgeous*... I picked the turquoise soap below as my inspiration piece, and wanted to use the colors and round angles of the soap on my card.


This week, I decided to make a little somethin' somethin' for my daughter to put up on her memo board in her room. LOL, she's only 4, so she isn't reading yet, but she'll appreciate it being "sparkly." :) To create the background, I used the Small Hearts Background image from the Cutting Cafe, and colored it in using Photoshop Elements (picking up the colors directly from the soap photo).

To be entered for a chance to win this week's prize, all you have to do is create a card using one of the items from the Amethyst Soap shop as inspiration, and link back to the EtsyInspired blog by Friday, January 22nd. (Please click the EtsyInspired link for more info.)

Instructions

  • Cut a 3 3/4" circle from patterned paper, and color in the background (or print the colored background with your printer, and then cut out the circle).
  • Cut a 4" circle from black CS, and distress the edges before adhering the patterned paper on top.
  • Apply Scor-Tape to the back of the black CS circle, then ruffle ribbon around the edges.
  • Print image background for sentiment, and stamp sentiment in black ink before cutting out.
  • Adhere aqua pearls to background, attach sentiment layer and embellish background with rhinestones.


Supplies:

Stamps - Heart Prints (PTI), Small Hearts Background (Cutting Cafe), Monogram Shapes (Cutting Cafe)

Ink - True Black

Paper - True Black, Stamper's Select White, Printer Paper

Miscellaneous - Aqua Satin Ribbon, Basic Grey Aqua Opaline Pearl Flourish, Black Rhinestones, Distresser

1.09.2010

Etsy Inspired Challenge #70 - I {heart} You


Hi everyone! We're back to Saturday again, which means there's a new EtsyInspired Challenge. :)

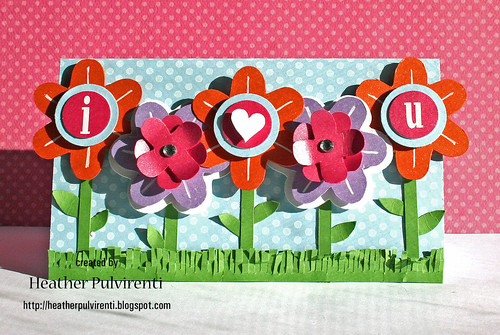
The Etsy store we're using as inspiration this week is Skylar's Candy Clips, and they feature tons of really cute and colorful hair accessories for girls. I chose two of the flowers in the picture below, and used the flower colors and shapes on my card.


I have a Slice machine, which doesn't get as much use as it should, and I was so psyched when I found I could closely replicate the flowers used for the hair clips... How fun is that?! :) The sponsor this week is the PaperTemptress, and they specialize in all types of paper... I'm not sure if it's easy to tell in the photo or not (since the sun was shining so brightly), but the orange, pink and purple papers I used are metallic, and they have such a lovely shimmer!

There are two different prizes this week... One from the sponsor, and one from the featured Etsy store. To be entered for a chance to win one of the prizes, all you have to do is create a card using one of the items from the Skylar Candy Clips shop as inspiration, and link back to the EtsyInspired blog by Friday, January 15th. (Please click the EtsyInspired link for more info.)

Instructions

  • Trim blue CS to 6" x 7", score at 3 1/2" and fold in half to create your card base.
  • Stamp the card base with white polka dots.
  • Using a Slice machine (or punches), create five flowers (three of one, and two of another).
  • Assemble flowers using pop dots, and add faux white stitching to the petals.
  • Embellish flowers with rhinestones and rub-ons.
  • Cut a strip of green CS to 1/2" x 6" and snip little blades of grass.
  • Cut strips and pieces of green CS for flower stems and leaves.
  • Arrange all the flower parts to your liking and adhere them to the card base with adhesive and pop dots.
  • Adhere grass to card base and scrunch it to give it some interest.


Supplies:
Stamps - Polka Dot Basics 2
Ink - Fresh Snow
Paper - New Leaf, Spring Rain, Stamper's Select White, Amethyst Stardreams (PaperTemptress), Azalea Stardreams (PaperTemptress), Flame Stardreams (PaperTemptress)
Miscellaneous - White Gel Pen, Clear Rhinestones, Slice Basic Shapes 2 Cartridge, GinX Rub-Ons

1.02.2010

Etsy Inspired Challenge #69 - Guess what?!


Hi everyone! I'm getting ready to head off to bed, but wanted to pop in with a post first. :) I was invited to be a Guest Designer for the EtsyInspired blog for the month of January, and am super excited! Inspiration challenges are usually, well, a challenge for me *smiles*, but I am really looking forward to pushing myself creatively and trying something new!

This week's EtsyInspired shop is Manic Muffin Totes. This shop has the *cutest* handmade owls. Seriously... Just look at that face! I love the mix of fabrics that they use to create the owls, and chose this little cutie as my inspiration piece (focusing on the owl's colors):

This week's sponsor is Tiddly Inks,

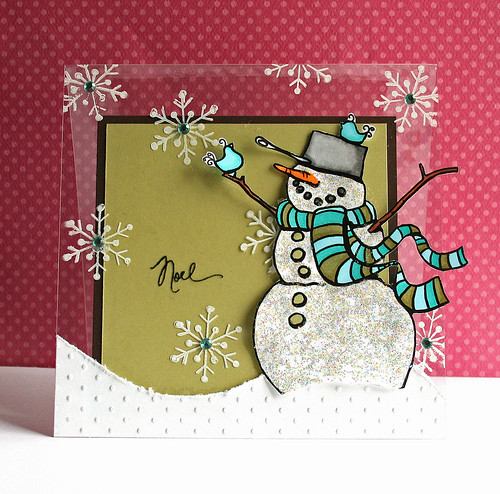
and I opted to use a sweet little snowman as my main image. I added some stickles to give some sparkle, and there's just something about his arm raised position that makes me happy! :) To enter for a chance to win 3 digi stamps of your choice from Tiddly Inks, all you have to do is create a card using one of the items from the Manic Muffin Totes shop, and link back to the EtsyInspired blog by Friday, January 8th. (Please click the EtsyInspired link for more info.)

Enjoy the rest of your weekend and I'll be back with another post on Monday. :)


Instructions:

  • Create a 5" square card base from acetate.
  • Print out the digi stamp, color it in with Copics, and then cut it out before giving it a good smattering of stickles.
  • Stamp the card base with white snowflakes.
  • Stamp the sentiment in brown stazon ink.
  • Hand cut the snow for the ground using white CS, then run it through the cuttlebug to emboss it with dots.
  • Distress the top edge of the white CS before attaching it to the card base.
  • Cut a 3 3/4" square piece of light green CS, and layer it on top of a 4" square piece of brown CS. Adhere to the inside of the front flap of the acetate card.
  • Once the stickles have dried, adhere the snowman to the front of the card base.
  • Embellish snowflakes with aqua rhinestones.


Supplies:
Stamps - Snowman (Tiddly Inks), Snowflake Serenade (PTI), Signature Christmas (PTI)
Ink - Stazon Timber Brown, Fresh Snow, Copics
Paper - Spring Moss, Dark Chocolate, Stamper's Select White
Miscellaneous - Cuttlebug Swiss Dots Embossing Folders, Distresser, Aqua Rhinestones, Stickles, Acetate