Showing posts with label Simon Says Stamp. Show all posts
10.23.2015
Thanks!
Hello! I'm popping in to share a card I created using one of my faves from The Alley Way Stamps, Winter's Butterflies.
To create my card, I started by heat embossing several of the snowflakes from Winter's Butterflies with white embossing powder onto watercolor paper. I then colored the panel with watercolor pens and a waterbrush.
While the watercolor panel was drying, I die cut a large Thanks from silver glitter CS using the SSS Big Thanks die. To finish up, I adhered the embossed panel to a light gray card base using foam tape, then glued the die cut sentiment to the card front.
Have a great one!
9.16.2015
Stamptember: Heidi's Bloom w/Winnie & Walter
Hello! I'm popping in to share a card I created using Winnie & Walter's collaboration Simon Says Stamp set, Heidi's Bloom. This set features a ginormous flower and many coordinating flower centers which can be used in so many different ways... Paper piecing, watercoloring, layering, etc. Love, love, love all the many looks this stamp set offers! :)
Once the flower and leaf images were dry, I went back and added a background wash to the paper. Since I'm impatient, I heat set the paper to help it dry, then adhered it to a light gray card base. To finish up, I adhered the sentiment to the card front and embellished with fuchsia enamel dots.
Have a great one!
7.28.2015
Thinking of You
Hello! I'm popping in to share a gift bag I created using goodies from Whisker Graphics and Simon Says Stamp.
To create my bag, I started with a Horizontal Stripe Middy Bitty Bag in navy, and added three Sweet Sticky Labels in aqua to the front. I then stamped the center of each label with one of the flower images from the Summer Garden SSS set. Next, I cut one of the Large Colored Tags in gray into a strip, then stamped it with a sentiment in versafine before heat embossing with clear powder.
The sentiment strip was then trimmed into a banner shape, then adhered to the gift bag with pop dots. To finish up, I embellished with Aqua Divine Twine and silver enamel dots. So easy! :)
Have a great one!
10.03.2014
Simon Says Stamp - Cold Hands, Warm Heart Blog Hop
Hello! I am so excited to be a part of today's Simon Says Stamp Cold Hands, Warm Heart Blog Hop! :) Hopefully you've arrived by way of Stephanie Klauck's blog. If you'd like to start at the beginning of the hop on the Simon Says Stamp blog, please click here.
There are so many great products in the current Cold Hands, Warm Heart release, so I went a little crazy and created three different projects for today! :) For my first card, I started by die cutting a mint mat using the Bundle of Stitches Wafer Dies, and stamping it with the mini snowflake image from Winter Warmth, before heat embossing with white embossing powder. I then cut a piece of white card stock with a slope to mimic snowy hills and wrapped it with twine before before securing it to the mint mat.
I die cut a medium gray banner using the same wafer dies, and stamped the sentiment in versamark before heat embossing with white powder, then attached it to the card front with pop dots. Next, I die cut a house and several trees using the Village Wafer Dies, then adhered them to the card front with pop dots. To finish up, I covered the trees with stickles for a little added sparkle, then embellished with aqua rhinestones.
For my next project, I created a tag using the Winter Warmth stamp set. I started by cutting a tag shape, then using embossing paste with the Diagonal Stripe Stencil. While the paste was drying, I stamped the scarf image in versamark onto fuchsia card stock, and heat embossed it with white powder. I then stamped the sentiment on top in versamark, and heat embossed with platinum powder before die cutting the shape.
The mittens were stamped onto turquoise card stock, heat embossed with white powder then cut out with the coordinating Warm Wishes Dies. I then stamped the hearts from Winter Warmth, and cut them out with their coordinating dies. A piece of solid yellow twine was added to the back of the mittens before adhering them to the tag front with pop dots. I covered the mittens with stickles, then attached the hearts once dry. To finish up, I attached the sentiment to the tag front with pop dots, added some yellow baker's twine, and embellished with clear rhinestones.
My last project is a little on the bright side, so you may want to break out your sunglasses! Lol :) I started by stamping the Trees Background image in versamark onto watercolor paper, then heat embossing with white powder. I then colored the background with a watercolor wash using Peacock Feathers Distress Ink.
Next, I die cut the sentiment using the Christmas Blessing dies on silver glitter paper. Once the watercolor paper was dry, I added lime green ribbon to the layer before attaching the image to the card front with pop dots. I then added a lime green bow and adhered the sentiment to the card front with tombo multi-glue. To finish up, I embellished with black enamel dots. Whew! We made it! :)
Giveaway time! :) Simon Says Stamp will be giving away a grab bag Prize Pack to 1 commenter on every blog in the hop. To be entered to win, all you need to do is leave one comment on each stop of the hop (17 chances to win!). Comments will close at 1:00pm EST on Friday, October 10, 2014, and the complete winners list will be posted on the Simon blog.
Thank you so much for spending part of your day with me... The next stop on the hop is Wanda Guess' blog!
Here is the full list of participants for today's hop:
Have a great one!
8.29.2014
W&W Share the Love: Sketch Time
Hello! It's the last of the challenges from the Share the Love Week with Simon Says Stamp. Today's card was created using the sketch below:
To create my card, I started by stamping some of the flower images from SSS's Summer Garden in pink ink onto white CS. Once they dried, I then stamped one of the sentiments from The Big, the Bold and You in turquoise ink.
Want to play along with us today? You could win a $25 gift certificate from Simon Says Stamp! For more info, please hop on over to the Winnie & Walter blog! :)
Have a great one!
8.28.2014
W&W Share the Love: One Layer Cards
Hello! I'm back again with another card I created for Share the Love week with Simon Says Stamp. Today's challenge? One layer cards. Okay, so you're looking at my card, and well, it's not exactly a single layer... but it's close, right??? ;) Haha, does that count?
For my card today, I started with a white card base, then stamped the row of polka dots from the Simon Says Stamp Happy Every Day set in pink, yellow, orange, green and aqua.
I then stamped the grateful sentiment from The Big, the Bold and Blessings in light gray ink, then cut it out. Next, I stamped the remainder of the sentiment in versamark onto gray CS before heat embossing with white powder. To finish up, I adhered the sentiment and gray CS strip to the card front with pop dots, then embellished with purple enamel dots.
Want to play along with us this week? You could win TWO STAMP SETS ($30 gift certificate) from Winnie & Walter! For more info, please hop on over to the Winnie & Walter blog! :)
Have a great one!
8.26.2014
W&W Share the Love: 10 Minute Dash
Hello! :) This week over on the Winnie & Walter blog, they're hosting another "Share the love" feature, which is a series of posts showcasing projects that combine W&W stamps with other company's fabulous products. This week, the DT has created projects using Simon Says Stamps' stamps in conjunction with W&W stamps and a fun challenge. Today's challenge? To create a card in 10 minutes or less. This was SO HARD. Lol... I am a simple stamper, but I am a slooooow stamper. :P
For my card today, I started with a light gray card base, and stamped the single line image from Simon Says Stamps' Happy Every Day set in versmark to create a striped pattern. I then die cut an aqua scallop circle, and nesting white circle, and adhered them together. Next, I stamped the focal sentiment from The Big, the Bold and You in teal ink, then cut it out.
WHEW!! 9 minutes 57 seconds and some change later... I almost thought I wasn't going to finish, but I did it. WAHOOO! :)
Want to play along with us this week? You could win TWO STAMP SETS ($30 gift certificate) from Winnie & Walter! For more info, please hop on over to the Winnie & Walter blog! :)
Have a great one!
6.24.2014
Just For You
Hello! I'm popping in to share a gift bag I created using some Whisker Graphics and Simon Says Stamp goodies. I am usually super critical of my work, but I love the way this came together! It just screams *happy*! :)
To create my project, I started with a Pink Large Colored Tag from Whisker Graphics, which I stamped with some of the images from Simon Says Stamps' Summer Garden set in versamark ink before heat embossing with white powder.
I then secured the tag to the Gray Middy Bitty Bag with some Coral Divine Twine, and finished up by embellishing with gray enamel dots. Clean, simple, lovely!
Have a great one!
5.01.2014
You're In My Prayers
Hello! I'm just popping in to share a card I created using the Outline Poppy stamp I recently purchased from Impress Rubber Stamps. I love, love, love this huge outline floral image, and wanted to create a card that showcases its simple beauty.
To create my card, I started with a sea glass CS card base, and stamped the flower image three times in Versamark ink before heat embossing with white powder. Next, I stamped the sentiment from SSS's Handwritten Greetings set onto coral CS, then heat embossed with platinum powder.
I then cut a banner end on the strip of CS, and adhered it to the card front with pop dots. To finish up, I embellished with white enamel dots.
Have a great one!
Supplies:
Stamps - Handwritten Greetings (SSS), Outline Poppy (Impress)
Paper - Sea Glass (SSS), Carnation (Hero Arts)
Ink - Versamark (Tsukineko)
Miscellaneous - White Enamel Dots (Doodlebug Designs), Platinum Embossing Powder, White Embossing Powder (Hero Arts)
4.26.2014
C4C233 - Hi There
Hello! It's Saturday, which means it's time for another Crazy 4 Challenges challenge. This week, the theme is April Flowers Bring May Showers, so we're tasked with creating cards that feature both flowers and rain (images or sentiments).
To create my card, I started with by trimming a piece of rainbow rain patterned paper to fit a standard A2 card base, and adhered it with tombo. Next, I cut a piece of vellum to fit the card front, then stamped it with a doodle flower image from Impress Rubber Stamps in Versamark ink before heat embossing it with white powder. Once it was heat set, I added small droplets of adhesive around the card front, then secured the vellum. I then stamped the Simon Says Stamp sentiment in gray ink onto a piece of mint CS, and adhered it to the card front with pop dots. To finish up, I embellished with some yellow enamel dots.
Want to play along with us this week? All you need to do is create a card/project using both rain and flowers, and link up to the C4C233 blog post! :)
Have a great one!
3.15.2014
C4C227 - To the Moon and Back
Hello! I hope your weekend is off to a great start! :) It's Saturday, which means it's time for another Crazy 4 Challenges challenge. This week, the challenge is to create a card/project using the provided sketch as inspiration + the color green.
To create my card, I started with a pink card base, and adhered a piece of scribble circles patterned paper to the card front. Next, I stamped the heart image onto white CS with pink ink, then punched it out with a 2" circle punch before adhering it to the card front with pop dots. I then stamped the sentiment in versamark ink and heat embossed it with white powder. Once that was done, I trimmed the edge of the green CS to give it a banner shape, then attached it to the card front with pop dots. To finish up, I embellished the card with yellow ribbon.
Want to play along with us this week? All you need to do is create a card/project using the sketch below as inspiration, and link up to the C4C223 blog post! :)
Have a great one!
3.08.2014
C4C226 - You Are a True Friend
Happy Saturday! :) It's time for another Crazy 4 Challenges challenge. This week, the the challenge is to create a card/project where the sentiment is the star of the show.
To create my card, I started by cutting three strips of mint card stock and adhering them to a yellow card base. Next, I die cut a large circle from gray patterned paper, then heat embossed the sentiment with white powder. To finish up, I attached the die cut with pop dots, then embellished with orange enamel dots. Fast and fun!
Want to play along with us this week? All you need to do is create a card/project incorporating purple, and link up to the C4C226 blog post...
Have a great one!
Supplies:
2.15.2014
C4C223 - Hello
Hello! I hope your weekend is off to a great start! :) We've had a ton of snow lately, so we've managed to use up our available built-in snow days. It's looking like they'll be going to school until July! Lol... My parents made a surprise visit on Valentine's Day, and ended up taking an extra passenger back to their house (our daughter). She couldn't have been happier (my parents are her two most favorite people in the world), and it will help reduce the cabin fever by giving her a change of scenery. :)
My card today is for the current Crazy 4 Challenge C4C223 challenge, which is a sketch challenge. This week's challenge was a bit of a toughie for me... I probably cheated a little bit by flipping the sketch and using splatter for the upper panel (hehe, oops!), but nonetheless, I got it done. Yessssss! :)
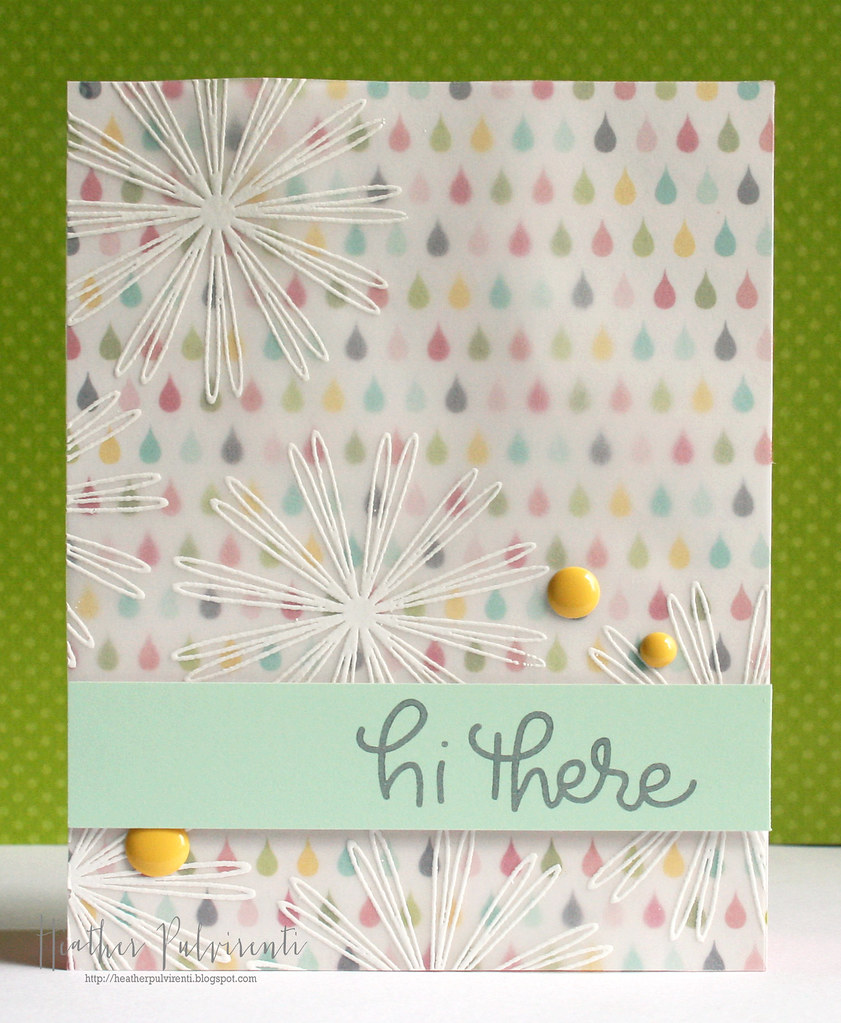
To create my card, I started with a light gray card base, and used a paint brush to flick drops of pearlized paint onto the upper left corner. The effect is very subtle, but adds some great shimmer when looking at it IRL. :) Next, I die cut 7 hello sentiments (6 from white cardstock, and 1 from yellow cardstock), and adhered them together.
I then stamped the flower and leaf images from Avery Elle's Petals & Stems set onto white cardstock and cut them out. After that, I adhered a strip of patterned paper to the card front, as well as some Teal Twine from Whisker Graphics. To finish up my card, I adhered the sentiment and flower/leaves to a white cardstock and attached it to the card base with pop dots before embellishing with clear gems.
Want to play along with us this week? All you need to do is create a card/project using the sketch below as inspiration, and link up to the C4C223 blog post... Easy peasy! :)

Have a great one!
Supplies:
Stamps - Petals & Stems (Avery Elle)
Paper - Soft Stone, Harvest Gold, Stamper's Select White, Soft Stone Striped Paper (PTI)
Ink - Winter Wisteria, Limeade Ice (PTI)
Miscellaneous - White Color Shine (Heidi Swapp), Clear Gems (Hero Arts), Teal Twine (Whisker Graphics), Hello Die (Simon Says Stamp)
10.08.2013
Happy Birthday Wishes
Happy Tuesday! I'm popping in to share a card I created using some Fresh Squeezed Stamp goodies.
To create my card, I started with a kraft woodgrain card base which I trimmed down to 3 1/2" wide to accommodate my large sentiment banner. Next, I stamped three of the patterned images from Happy Hexagons onto colored cardstock, and heat embossed them with white powder before cutting them out.
After all the hexagons were cut out, I played with their arrangement before adhering them to the card front with pop dots. Next up, I added two strips of green cardstock to the card front, and stamped the sentiment from Trendy Triangles in turquoise ink. To finish up the card, I die cut the word happy, covered it with stickles, and adhered it to the banner.
Have a great one!
Supplies:
Stamps - Trendy Triangles & Happy Hexagons (Fresh Squeezed Stamps)
Paper - Kraft Woodgrain (Simon Says Stamp); Hawaiian Shores, Harvest Gold, Raspberry Fizz, Limeade Ice & Stamper's Select White (PTI)
Ink - Versamark (Tsukineko); Hawaiian Shores (PTI)
Miscellaneous - Happy Die (Simon Says Stamp); Stickles (Ranger); White Embossing Powder (Hero Arts)
Subscribe to:
Posts (Atom)